The importance of grain size in jewelry alloys and its control
The importance of grain size in jewelry alloys and its control
a speech by Chris Corti
Abstract
Control of grain (crystal) size in jewellery manufacture is important for several reasons. It affects the properties of the alloys – mechanical, chemical and physical. These, in turn, influence the manufacturing process and the jewellery’s behaviour during wear by the customer.
There are a number of ways grain size (and shape) can be controlled in precious metal jewellery alloys – by casting, working and annealing and by use of alloying additives that refine the grain size during casting and during working and annealing. These are reviewed and discussed in terms of their mechanisms, ease of use and their effectiveness. Some of the problems that can arise from lack of control will also be discussed. The focus of the presentation will be on gold alloys but all precious metals are considered.
Introduction
Anyone involved in the making of jewellery should have an appreciation of the nature of the metals and alloys with which they work and understand how alloying and processing of the metals influences the microstructure and consequently their properties. For jewellery, we focus on the alloys of the precious metals – gold, silver, platinum and palladium, all four of which are inherently ductile metals – but what I say is of general validity and applies to most metals.
Two fundamental points to understand are that1:
- Alloy composition, microstructure and processing history are interrelated, Figure 1, and jointly influence an alloy’s properties, be they chemical (e.g. corrosion and tarnish resistance), physical (e.g. density, colour) or mechanical (e.g. strength, malleability, hardness). These, in turn, influence manufacturability and service performance.
- Most metals and alloys are composed of many crystals, or grains as we metallurgists call them; thus, most alloys are polycrystalline. There are some rare exceptions such as single crystal aero turbine blades and amorphous or glassy metals.
In this presentation, I want to focus on alloy macro- and micro-structures, particularly grain size and shape. How we can influence them by casting, alloying and by mechanical working and annealing? Why are they important?
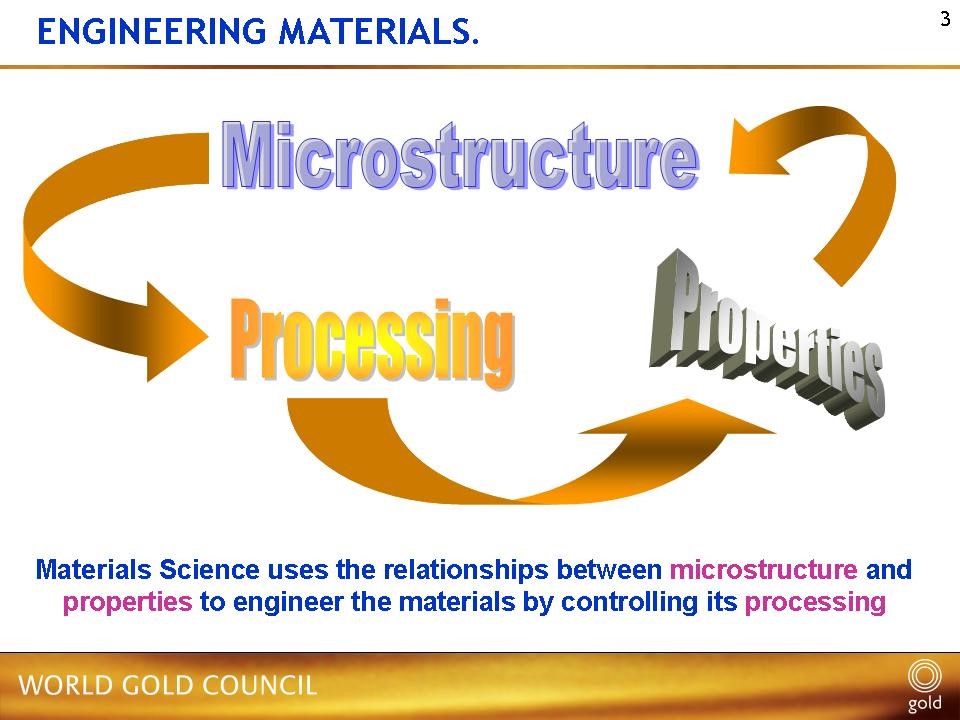
Figure 1 – Interrelationship of alloy composition, microstructure and processing history on properties (schematic)
Importance of grain size to jewelry
As jewellers attending this Jewellery Technology Forum will know, metallurgists pay some attention to the crystal, or grain, size in their alloys. We talk about ‘large (or coarse) grains’ or small (or fine) grain sizes and generally state the desirability of the latter in terms of jewellery production. The terms ‘large’ and ‘small’ are, of course, relative. But for practical purposes, ‘Large’ will usually mean grains of the order of millimetres or larger and ‘small’ will refer to grain sizes of the order of tenths or hundredths of a millimetre (1 – 100 microns). You may also hear of grain sizes referred to in terms of an ASTM numerical value. This is a comparative method of measuring grain size. The higher the number, the smaller is the grain size.
Why is control of grain size (and shape) important? Well, it is down to the relation between the grains (crystals) and the grain boundaries – the region at the junction of adjacent grains – and their relative influence on mechanical deformation processes. Grain boundaries are where the atoms sitting on the crystal lattices of adjacent grains do not match across together, creating a narrow region of imperfect crystal, Figure 2. Often, these can be a preferred site for deleterious impurities and second phases, leading to embrittlement. At low or ambient temperatures, the deformation process under an imposed load is governed mainly by the dislocation slip mechanism within each grain (dislocations are linear crystal defects responsible for deformation on crystal slip planes). Without going into deep explanations, the outcome is that alloys with finer grains are stronger than those with large grains, and this effect is expressed by the Hall-Petch relationship in which yield strength, σy.s., is inversely related to the grain size squared:
σy.s. = m/d2
where d is the average grain diameter and m is a constant. The yield strength of a material (known also as the Elastic Limit or proof stress) is the stress required to start plastic deformation and is smaller than the ultimate tensile strength (‘UTS’).
Thus, the jewellery is stronger and harder if it is fine-grained and, beneficially, it is also more ductile and less prone to cracking, impurity embrittlement and the ‘orange peel’ surface after deformation. As jewellery is generally only subject to relatively simple stresses (loads) at ambient temperatures, whether in a production environment or in service, a fine grain size is therefore desirable. This is generally true for other non-precious engineering components such as sheet steel for car bodies and white goods.
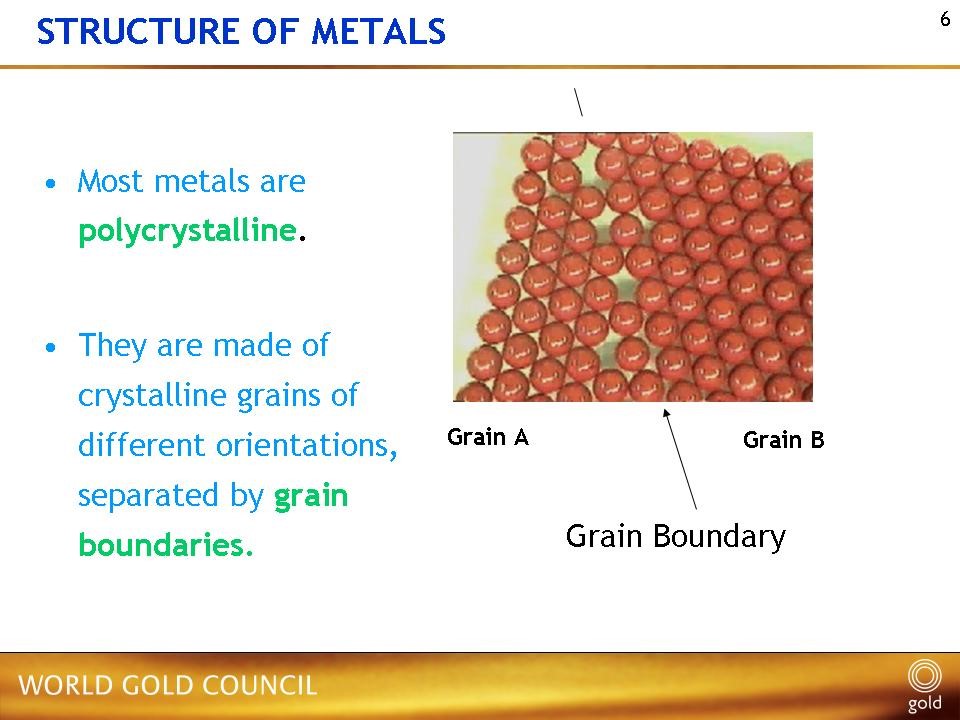
Figure 2 – Schematic of a grain boundary, showing the mismatch of crystal structure at the boundary
On the other hand, engineering components can be subjected to often-complex stresses over long periods at high temperatures; for example, turbine blades and disks in jet engines and boiler tubes in utility power stations. At these high temperatures, the main deformation mechanisms are phenomena such as creep and fatigue. Creep is the slow deformation under a steady low stress or load and fatigue is the mechanical failure under an alternating load. The lead sealing on a tiled church roof is actually at a hot working temperature and so slowly creeps under its own weight. Under such conditions, the grain boundaries are weaker and grains can slide over each other; hence, a large grain size is preferred as there is relatively less grain boundary area. In the ultimate, such as gas turbine blades, we prefer to eliminate grain boundaries, so we find use of directionally solidified alloys and even single crystal alloys for optimum creep and fatigue strength. An extreme of fine grain sizes is a phenomenon known as superplastic deformation, whereby alloys with stable, fine grain sizes can be gently deformed at temperature under low stresses to very large deformations, just like Swiss cheese fondue. Several titanium aircraft components of complex shape are manufactured by this technique including the very large fan blades on Rolls Royce jet engines. Interestingly, fine-grained sterling silver can be superplastically deformed under the right conditions2 and I would expect some other precious metal alloys also to do likewise. But to date, that ability has not been developed or commercially exploited in our industry.
Examination of microstructure: metallography
As many of you will also know, we can examine the microstructure and measure the grain size of a piece of jewellery metal; due to the scale of this, it is often performed under an optical microscope. The process of examining grain size and general microstructure is called ‘metallography’. Figure 3 shows the microstructure of both as-cast and cold worked and recrystallized gold alloys. There are obvious differences in appearance and these will be explained later.

Figure 3 – Microstructure of typical karat gold alloys (a) as cast, (b) worked and annealed
Normally, if we wish to examine the macrostructure or microstructures of an alloy, we need a flat polished surface as optical microscopes have a limited depth of focus. In order to expose the features such as grain boundaries and second phases, we often need to etch the surface with a corrosive liquid such as acid. As grain boundaries are less perfect than the crystals, they etch preferentially to reveal themselves. As different crystals are oriented in different directions relative to the plane of the surface, they also etch at different rates and so appear of different contrast or colour to the eye. Where more than one phase is present, these also etch differently and usually show themselves as different colours or shades of darkness.
If we need greater magnification than we can get in an optical microscope to see the features of interest or we have an uneven surface such as a fracture, then we use a scanning electron microscope. Here flatness of the surface is not such an issue as in optical light microscopy and we can often see different phases by atomic number contrast, without the need for etching (see figure 22 in reference 3, for example)3,4. The heavier elements appear whiter under the SEM and the lighter ones darker, so giving rise to differences in contrast with varying alloy phase composition.
Casting
Melting and casting is a process for producing alloys of the desired composition and also for specific shapes. These can be either net shapes, as in investment (lost wax) casting, or stock materials, i.e. ingots, that can be further processed to modify the shape, structure and properties. Casting involves melting and the solidification of molten metal. Subsequent mechanical processing of ingot materials enables us to break down coarse, non-uniform structures to more desirable refined structures better suited to the purposes that we require in manufacture and in subsequent service and generally have improved, more consistent properties.
The structure of cast alloys depends on the rate at which we cool and solidify the metal which, in turn, depends on the size of the casting and the thermal conductivity of the mould material. Thus, the structure of large ingots will differ from that of small investment castings. We will explore the influence of casting conditions shortly.
Influence of solidification on grain size and shape
As has been mentioned before5,6, pure metals solidify at a fixed temperature; for example gold solidifies at 1064°C and silver at 962°C. Most alloys*, on the other hand, solidify over a temperature range: the liquidus temperature is the temperature above which the alloy is completely molten and is the temperature at which solidification starts on cooling; the solidus is the temperature at which solidification is completed and thus below this temperature the alloy is completely solid. Between the liquidus and solidus, alloys comprise some liquid and some solid, often known as the ‘mushy’ or pasty state. The characteristics of solidification and the resulting structure are influenced by the temperature gap between the liquidus and solidus and the overall phase diagram for the alloy system.
[*There are a few exceptions, such as eutectic alloys which also solidify at a fixed temperature like the pure metals]
To understand the process of solidification, it helps to understand the atomic structure of liquids and how atoms coalesce to form solid material. The liquid state comprises mobile atoms in a dynamic, unstructured state. Some atoms will come together briefly to form a small cluster but these quickly break up.
As we cool a liquid (molten metal in our case), small clusters of atoms come together and stay together to form a nucleus. The formation of nuclei tends to occur at preferred sites such as a mould wall or at impurity particles/inclusions but can occur randomly in the melt. As the temperature falls, more atoms join the small stable clusters of atoms that comprise the nuclei in a structured way that is the crystal lattice of that metal or alloy. For our precious metals, that will be in the face-centred cubic arrangement discussed in another presentation1. These are the embryonic crystals (crystallites) that will make up our alloy. A fast cooling rate during solidification will lead to more nuclei forming and consequently, because each nuclei develops into a crystal or grain, a fine grain size results. A slow cooling rate leads to less nuclei forming and a resultant larger grain size. We should note that nucleation at inclusion particles is how insoluble grain refiners like iridium and ruthenium work in gold alloys, for example, by promoting nucleation.
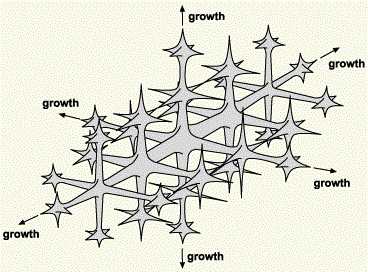
These nuclei grow by adding more atoms from the liquid. They do so in preferred crystal directions, extending from the cube faces and branching out as the crystal grows. This results in a tree-like structure that we call a dendrite. All the nuclei grow into dendrites, each of which will have an orientation dependent on the orientation of the original nucleus. Each dendrite continues to grow until it collides with an adjacent dendrite. The interface between them forms a boundary. This we call the crystal boundary, or more usually, a grain boundary. Here, the atoms on each lattice do not fit together cleanly, so creating a thin region of imperfect crystal, as we have discussed earlier. Figure 4 shows some dendrites in a platinum alloy7. We can clearly see several dendrites, each pointing in different directions. We often see such dendrites in shrinkage cavities in investment casting. Provided there is feeding of more liquid metal, the spaces between dendrites eventually fill up to give solid metal. If there is restricted feed, then shrinkage cavities (porosity) will result.
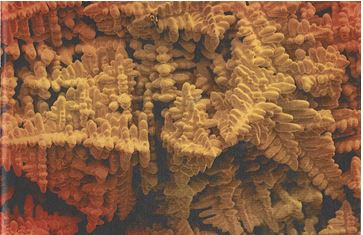
Figure 4 – SEM image of dendrites in Pt-Ru alloy, seen in a shrinkage cavity (from reference 7)
If we examine an etched metallographic section of a cast metal under the microscope, such as shown in Figure 3, we can clearly see the dendritic structure. We also note that the dendrite centre etches up differently to the outer zone; this is due to chemical segregation, whereby the metal that solidifies first has a different chemical composition from that which solidifies last. This is known as ‘coring’. Why that is so, we can readily explain from the phase diagram6.
When we pour molten metal into a mould, it begins to solidify inwards from the mould walls as this is the coldest temperature. If a cold metal (e.g. iron) mould is used, as is usual for ingot casting, the rate of heat removal is rapid. Initially, a thin layer of fine grains is formed – the chill layer – because of the high rate of nucleation. Then long finger-like grains – called columnar grains – begin to grow inwards from the chill layer towards the centre of the ingot, Figure 5.
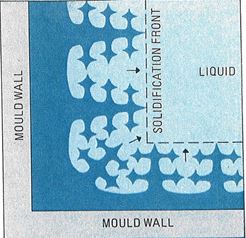
Figure 5 – Solidification proceeds inwards from the colder mould walls
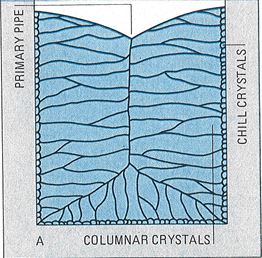
Figure 6 – Grain structure of ingots cast into metal moulds at a relatively high pouring temperature
If the metal casting temperature is relatively high, this columnar growth will extend into the centre of the ingot, Figure 6. This is not a good structure if you are going to roll the ingot to plate or sheet, as it may split down the middle (known as alligatoring, Figure 7), as this is also where impurities will tend to concentrate as it is the last metal to solidify.
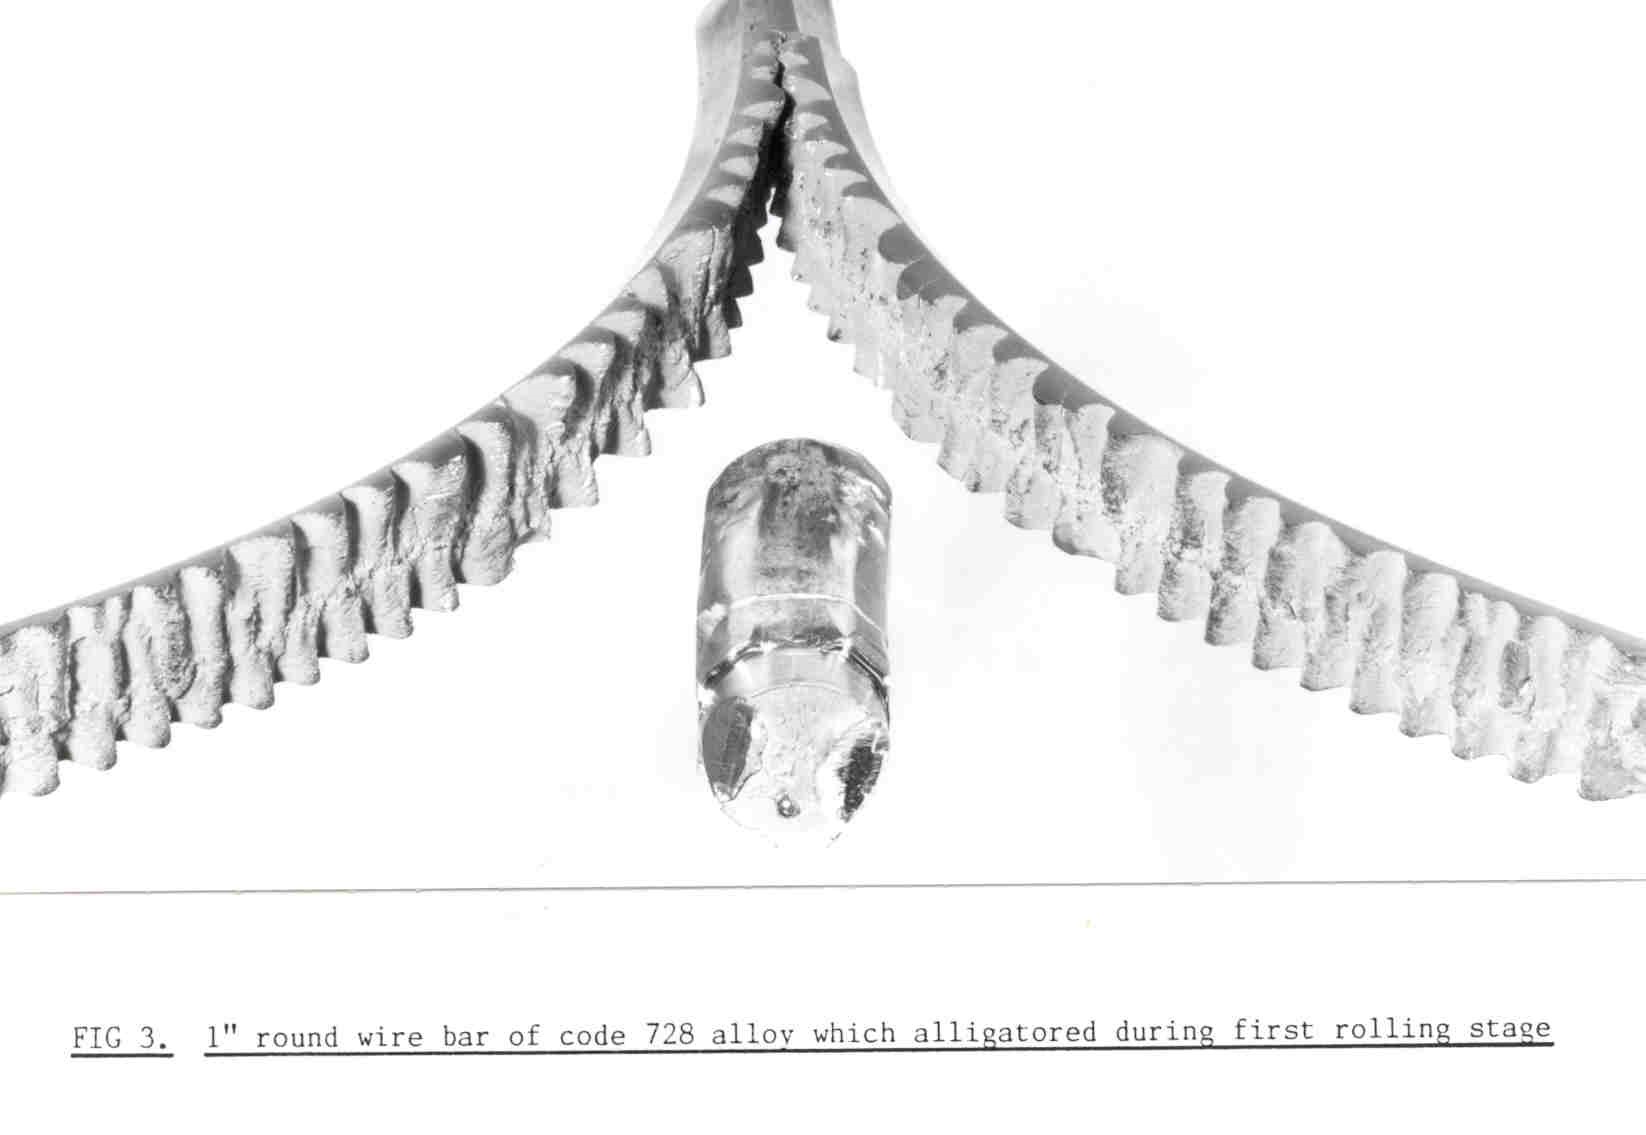
Figure 7 – Splitting of gold alloy ingot down the centre during rolling (‘alligatoring’)
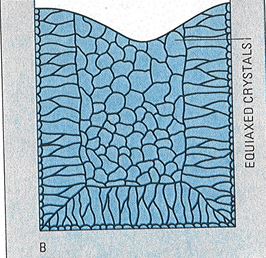
Figure 8 – Grain structure of ingots cast into metal moulds at a relatively low pouring temperature
When a ceramic (plaster) muold is used, as in investment (lost wax) casting, the cooling rate is markedly slower and equiaxed grains are formed throughout the casting. This is a preferred microstructure. Temperature of melt and mould can play a role in determining the as-cast grain size. The higher the temperature, the coarser the grain size.
Refining cast microstructures by working to improve grain size
As we have seen, cast microstructures may not be optimum for manufacturing or service. Chemical segregation (‘coring’) and coarse structures can lead to poor mechanical and corrosion properties. So working of ingot material serves two purposes: (a) to change the physical shape to that desired (sheet, wire, etc) and (b) to refine the structure. This may involve breaking down coarse grain structures, reducing segregation and refining coarse second phases to smaller, more uniformly distributed ones.
Much of this is best achieved by hot working the material, by hot forging or rolling, extrusion and/or drawing or combinations of methods. This will refine the structure but leave it more or less in a soft annealed condition. In hot working, as the metal deforms, it is at a high enough temperature for it to recrystallize (anneal) during the deformation.
If we wish to impart additional hardness and improved strength as well as a more accurate shape and superior surface, then we cold work the material, usually at ambient temperature. Here the temperature is insufficient to promote annealing.
If we overwork a material, it can crack or fracture, so we need to anneal the hard worked material from time to time to restore the soft, ductile condition and enable further working. Annealing involves a process of recrystallization, where the hard deformed grains reform themselves into new undeformed grains by a nucleation and growth process analogous to solidification.
Cold working and annealing: influence on microstructure & grain size
Cold working of metals results in an overall shape change. This is reflected by a change in the microstructure, where the grains must deform to accommodate the change in shape. This is shown schematically in Figure 9 for reduction by rolling. To achieve this, planes of atoms in each grain (crystal) must slide over each other, Figure 10, via crystal defects called dislocations. Such sliding occurs over several crystal planes in a complex way.

Figure 9 – The effect of cold working on the microstructure of single phase alloys
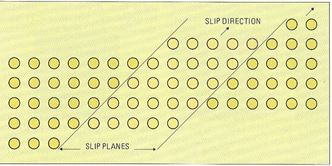
Figure 10 – Simplified sketch of slip in a crystal lattice
We also see this deformation in the overall macrostructure: Figure 11 shows one-half of the cross-section of a washer in the process of being upset into a wedding band; the heterogeneity of deformation is evident in its fibrous appearance. Most cold-working processes result in uneven deformation through the cross-section. In rolling or extrusion, for example, most deformation occurs at the surface, especially if only small reductions per pass are imposed. Uneven deformation can give rise to initiation of cracking from the surface, as Battaini has explained8. Such non-uniform deformation can also have repercussions on the grain structure on subsequent annealing when the process of recrystallization takes place. Recrystallization results in new undeformed grains replacing the old deformed grains. The fibrous cold-worked structure is replaced by recrystallized new grains, as can be seen in Figure 12.
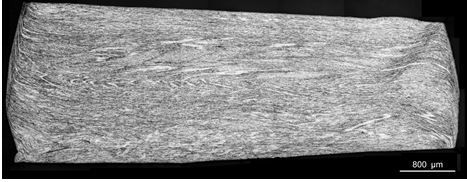
Figure 11 – Macrostructure of cross-section of a nickel white gold washer after partial upsetting towards making a wedding band (from reference 8)

Figure 12 – Recrystallized grains breaking up the fibrous cold-worked structure of washer in Figure 11 (from reference 8)
The resulting grain size after annealing depends on the amount of cold work, the annealing temperature and time. The more cold work, the finer is the recrystallised grain size. Annealing of material only cold-worked a small amount can result in large grains, which is undesirable (there is a critical minimum amount of cold-work necessary to initiate recrystallization, typically about 12-15% reduction). That is why annealing is often recommended only after substantial cold work, e.g. 60% reduction in thickness. The annealing temperature and time also play a part. Figure 13 shows a matrix of temperature and time of annealing for a 2N pale yellow 18 carat gold (cold-worked 70% reduction by rolling) and their effect on resulting annealed grain size (9). The variation in annealed grain size due to uneven amounts of deformation can be seen in Figure 14 which shows part of a cross-section of a ‘C’ shaped wire in an annealed 18 carat nickel white gold. The inside of the flange has a finer grain size and the outer regions have a coarser size, reflecting the uneven amount of deformation during rolling8. This may not be important in some instances, but it can be in others. Orange peel surfaces and cracking may result on further working, for example, where large grains are at the surface regions, as discussed earlier.

Figure 13 – Effect of temperature (horizontal axis) and time (vertical axis) on recrystallized grain size of a 2N 18 carat yellow gold (from reference 9)
Figure 15 shows schematically the effect of annealing temperature on hardness/strength , ductility and recrystallised grain size. An important point to note is that if the annealing temperature is too high, then grain growth can occur and very large grains can result. This is undesirable and can lead to the ‘orange peel’ rumpled surface and cracking on further working, as noted earlier. This can be a problem for craftsmen during gas torch annealing as there is less control of temperature during annealing and a tendency to overheat the piece. 14 carat coloured golds are especially prone to excessive grain growth during annealing, as Grimwade has noted10.
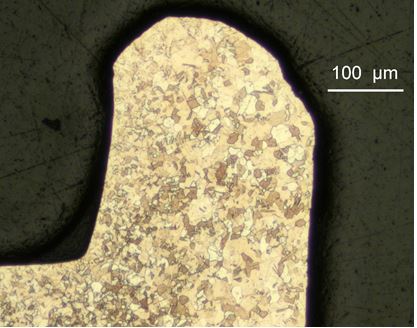
Figure 14 – Grain size variation in annealed cross-section of ‘C’ shaped cold rolled wire in 18 karat nickel white gold (from reference 8)
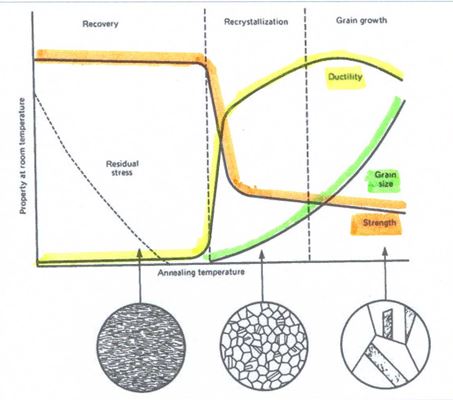
Figure 15 – Schematic: Annealing behaviour of cold-worked alloys as a function of annealing temperature. Note region of grain growth at high annealing temperatures
Two-phase alloys: Where an alloy consists of two (or more) phases, there is an effect on grain size after working and annealing. Working the alloy leads to a higher level of dislocations (crystal defects) in the matrix phase due to the presence of a hard second phase and this leads, in turn to a finer grain size after recrystallisation during annealing. Sterling silver is an example of a two-phase alloy.
Where the second phase is very fine, i.e. very small in diameter, and evenly distributed within the matrix phase, such as in age hardened alloys or micro-alloys, the second phase may inhibit recrystallisation as the fine particles of second phase can pin grain boundaries and so higher annealing temperatures may be necessary. In such alloys, a larger or more uneven grain size may result.
Alloying additions to refine grain size: grain refiners
Very small additions of grain refiners, typically at levels of about 0.1% or less, are often added to carat golds as fine powders to promote a fine grain size in the alloy. They include iridium, ruthenium and cobalt. Iridium and ruthenium are effective in casting, where they promote nucleation of crystals during solidification, and cobalt is effective during annealing of cold worked materials, where it promotes nucleation of grains during recrystallization. Iridium and ruthenium are insoluble in molten carat golds, so act as nucleation sites. Figure 16 shows the fine grain structure of an annealed 18 carat gold with iridium additions, compared to that without iridium. If too much is added or it is not well dispersed, one can get nests of hard particles at the surface that give rise to ‘comet tailing’ defects on polishing11. Note that grain refiners are not effective in silicon-containing carat gold alloys.

Figure 16 – Grain refining effect by iridium additions to an 18 ct gold. Left: with Ir, Right: without Ir (from reference 12)
The amount of cobalt that can be added is also sensitive to copper content of the alloy, as Ott has shown12. Its effect in grain refining a 14K gold is shown in Figure 17.
Other metals have also been shown to act as a grain refiner in gold alloys, such as boron, beryllium, yttrium and the rare earth metals, rhenium, rhodium, nickel, barium and zirconium13-16. In a more recent patent, a combination of iridium, rhodium and ruthenium added as a copper-master alloy is claimed to be effective17.
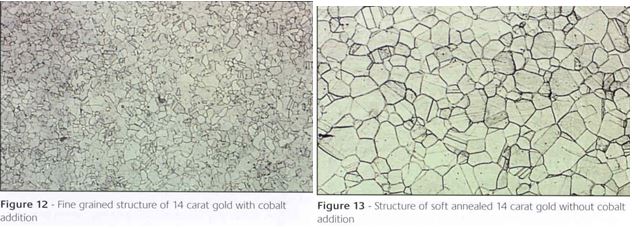
Figure 17 – Grain refining by cobalt in a 14ct gold. Left: with Co, Right: without Co (from reference 12)
Conclusion
In this presentation, it is concluded that, for jewellery manufacture, it is desirable to have a fine (small) grain size. It optimises strength and ductility and other properties such as corrosion resistance. Coarse grain sizes lead to ‘orange peel’ surfaces on subsequent deformation and enhance the tendency to crack as well as reducing strength, hardness and ductility. The yield strength is inversely proportional to the square of the grain size.
The influence of casting conditions on as-cast grain size and shape has been discussed in terms of nucleation of crystallites in the melt and solidification patterns. Melt temperature and mould material play an important role.
The influence of cold working on the as-cast macrostructure and the recrystallisation process during annealing has also been examined in terms of the resulting recrystallised grain size. Annealing temperature is an important factor to obtain a fine grain size. Too high a temperature can result in excessive grain growth, which is undesirable.
The use of grain refiners, such as iridium and cobalt in carat golds, to obtain a finer grain size has also been demonstrated. The mechanism is enhanced nucleation of crystallites during solidification or recrystallisation.
Acknowledgements
I would like to thank the organisers of the Jewellery Technology forum for inviting me to present once again and for their kind hospitality. I also thank many friends in the industry for allowing use of their figures and data. Many are courtesy of Mark Grimwade.
References
- Christopher W. Corti, “Basic Metallurgy of the Precious Metals – Part 1”, in The Santa Fe Symposium on Jewelry Manufacturing Technology 2017, ed Eddie Bell et al (Albuquerque: Met-Chem Research, 2017: 25-61. Also 2007: 77-108
- R.W.E. Rushforth, unpublished work, Johnson Matthey plc, 1978
- Stewart Grice, “Know your defects: The Benefits of understanding Jewelry Manufacturing Problems”, in The Santa Fe Symposium on Jewelry Manufacturing Technology 2007, ed Eddie Bell (Albuquerque: Met-Chem Research, 2007: 173-212
- Greg Normandeau, “Applications of the Scanning Electron Microscope for Jewelry Manufacturing”, in The Santa Fe Symposium on Jewelry Manufacturing Technology 2004, ed Eddie Bell (Albuquerque: Met-Chem Research, 2004: 345-388
- Mark Grimwade, “The Nature of Metals and Alloys” in The Santa Fe Symposium on Jewelry Manufacturing Technology 2001, ed Eddie Bell (Albuquerque: Met-Chem Research, 2001), 151-179.
- Mark Grimwade, “A Plaim Man’s Guide to Alloy Phase Diagrams: Their Use in Jewellery Manufacture – Part 1”, Gold Technology no 29, Summer 2000, 2-15. The author (Corti) can supply a pdf file of this on request
- John McCloskey, “Microsegregation in Pt-Co and Pt-Ru Jewelry alloys”, in The Santa Fe Symposium on Jewelry Manufacturing Technology 2006, ed Eddie Bell (Albuquerque: Met-Chem Research, 2006: 363-376
- Paulo Battaini, “Metallography in Jewlry Fabrication: How to avoid problems and improve Quality”, in The Santa Fe Symposium on Jewelry Manufacturing Technology 2007, ed Eddie Bell (Albuquerque: Met-Chem Research, 2007: 31-66
- Christian P.Susz, “Recrystallization in 18 carat gold alloys”, Aurum no 2, 1980, 11-14 The author (Corti) can supply a pdf file of this on request
- Mark Grimwade, Introduction to Precious Metals, Brynmorgan press, Maine, USA, 2009; ISBN978-1-929565-30-6
- Valerio Faccenda and Michele Condó, “Is ‘Pure’ Gold really Pure?”, in The Santa Fe Symposium on Jewelry Manufacturing Technology 2004, ed Eddie Bell (Albuquerque: Met-Chem Research, 2004), 135-150
- Dieter Ott, “Influence of Small Additions and Impurities on Gold and Jewelry Gold alloys”, in The Santa Fe Symposium on Jewelry Manufacturing Technology 1997, ed Dave Schneller (Albuquerque: Met-Chem Research, 1997), 173-196; Also: ibid, Gold Technology, No 22, 1997, p31-38 and “Optimising Gold Alloys for the Manufacturing Process”, Gold Technology, No 34, 2002, 37-44
- W S Rapson & T Groenewald, Gold Usage, Academic Press, London, 1978. ISBN 0-12-581250-7
- W Truthe, US Patent 2,143,217, January 1939 (assigned to Degussa)
- P Johns, UK Patent 2434376A, July 2007
- C Raub & D Ott, German patent DE2803949A1, August 1979
- M Poliero & A Basso, US Patent 2015/03544029A1, December 2015


